How To SSH Into Your Raspberry Pi Behind A Firewall Or Router (Even On Mac!)
Let's talk about something that's been bugging a lot of tech enthusiasts lately: accessing your beloved Raspberry Pi remotely. You’ve got a Raspberry Pi sitting in your home network, perhaps humming along as a media server, a home automation hub, or an IoT device, but you’re miles away and need to access it remotely. Perhaps you're at work, on vacation, or just in another room and don't want to physically connect a keyboard and monitor.
This is where the challenge lies. How do you access your Raspberry Pi, securely, from the outside world, without punching holes in your firewall and exposing your network to potential threats? This isn't just a niche problem; according to the 2022 state of Raspberry Pi survey by Maker Media, over 60% of Raspberry Pi users utilize SSH to access their devices. This highlights the critical need for reliable and secure remote access methods.
This article delves into the core of this challenge, providing a comprehensive guide to accessing your Raspberry Pi remotely via SSH (Secure Shell) while navigating the complexities of firewalls, routers, and network address translation (NAT). We'll explore various methods, including the traditional approach and more secure alternatives, ensuring you can configure your Raspberry Pis safely from another device or location, whether you're on a Mac or any other operating system.
Understanding the Remote Access Conundrum
SSH (Secure Shell) is one of the most powerful tools for remote access. It allows you to execute commands, transfer files, and manage your Raspberry Pi as if you were sitting right in front of it. However, it can be tricky when you have to deal with firewalls, routers, and network configurations. Most home networks are set up with a router that acts as a firewall, blocking unsolicited incoming connections from the internet. This is a crucial security feature, but it also means your Raspberry Pi, tucked away behind this protective barrier, isn't directly reachable from the outside.
Your router also uses NAT, which translates your private internal IP addresses (like 192.168.1.X) into a single public IP address that the internet sees. When an external device tries to connect to your public IP, the router doesn't know which internal device (your Pi, your laptop, your phone) the connection is intended for. This is the fundamental hurdle we need to overcome for remote SSH access.
Method 1: The Traditional Approach - Port Forwarding
The most common method to enable SSH on Raspberry Pi behind a router is to configure port forwarding. This involves telling your router to direct incoming traffic on a specific port (e.g., port 22, the default for SSH) to your Raspberry Pi's internal IP address. While effective, it comes with security considerations.
Steps for Port Forwarding:
- Enable SSH on Your Raspberry Pi:
First, ensure SSH is enabled on your Raspberry Pi. You can do this via the Raspberry Pi Configuration tool (
sudo raspi-config-> Interface Options -> SSH -> Enable) or by simply placing an empty file namedssh(no extension) in the/bootdirectory of your SD card before booting it up. - Find Your Raspberry Pi's Local IP Address:
On your Pi, open a terminal and type
hostname -I. This will give you its internal IP address (e.g., 192.168.1.100). - Access Your Router's Settings:
Open a web browser on your Mac (or any device connected to your network) and type your router's IP address into the address bar. Common router IPs include
192.168.1.1,192.168.0.1, or192.168.2.1. You'll need your router's admin username and password (often found on a sticker on the router itself). - Configure Port Forwarding:
Navigate to the "Port Forwarding," "NAT," or "Virtual Servers" section in your router's settings. This location varies greatly between router manufacturers. Here, you'll create a new rule:
- Service Port/External Port: Choose a port that will be open to the internet. While 22 is the default for SSH, it's highly recommended to use a different, non-standard port (e.g., 2222, 22222, or anything above 1024) to reduce automated scanning attempts.
- Internal Port: This should be 22 (the default SSH port on your Pi).
- Internal IP Address: Enter the local IP address of your Raspberry Pi you found earlier.
- Protocol: Select TCP (or TCP/UDP if TCP is not an option alone).
- Enable/Apply: Save the settings.
If your IoT device is behind a firewall, you may need to set up port forwarding on your router to allow SSH traffic. Therefore, if you are using a router, check the firewall settings on the router and ensure that port forwarding is set up correctly to allow SSH traffic to reach your Raspberry Pi.
- Find Your Public IP Address:
Go to a website like whatismyipaddress.com to find your home network's public IP address.
- SSH from Outside:
From your Mac's terminal, you can now SSH into your Pi using your public IP address and the external port you configured:
ssh pi@YOUR_PUBLIC_IP_ADDRESS -p YOUR_EXTERNAL_PORTReplace
YOUR_PUBLIC_IP_ADDRESSwith your actual public IP andYOUR_EXTERNAL_PORTwith the port you chose (e.g., 2222).
Security Considerations with Port Forwarding:
While effective, port forwarding essentially creates a direct path from the internet to your Raspberry Pi. This increases your exposure to potential threats. It's crucial to:
- Use a strong, unique password for your Pi.
- Consider setting up SSH key-based authentication and disabling password login for enhanced security.
- Keep your Raspberry Pi's software updated (
sudo apt update && sudo apt upgrade). - Use a non-standard external port.
Method 2: The Secure & Free Alternative - Encrypted Tunnels and VPN-like Solutions
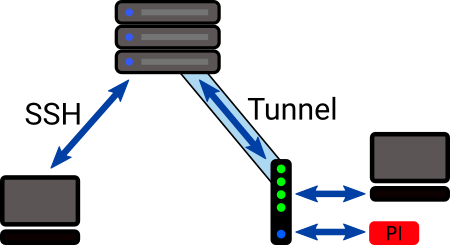
This is where things get really interesting, especially for those who prefer not to open ports directly or whose ISPs use Carrier-Grade NAT (CGNAT), making traditional port forwarding impossible. Yep, you heard me right: remote access Raspberry Pi behind firewall or router on Mac for free is entirely achievable without direct port exposure. In this tutorial, I will explain a method to log into your Raspberry Pi remotely to gain access even if it is behind a router or firewall. We'll set up an encrypted tunnel to bypass these network restrictions.
There are a few different ways to do this, but the core idea is to establish an outbound connection from your Raspberry Pi to a publicly accessible server or service. Since outbound connections are generally allowed by firewalls, this "reverse" connection can then be used to tunnel SSH traffic back to your Pi.
Option A: Virtual Private Network (VPN) Services like LogMeIn Hamachi
Services like LogMeIn Hamachi create a virtual private network (VPN) that connects your devices as if they were on the same local network, regardless of their physical location. This means your Mac and your Raspberry Pi can communicate directly, bypassing the need for port forwarding.
Steps with LogMeIn Hamachi:
- Create a LogMeIn Account and Network:
First, create a logmein.com account if you haven't already. From there, create a network (on the left side of the dashboard). This will be your virtual network.
- Install Hamachi on Your Mac:
Download and install the Hamachi client for Mac from the LogMeIn website. Once installed, log in with your account and join the network you created.
- Install Hamachi on Your Raspberry Pi:
This requires a bit of command-line work. Hamachi provides a Linux client that can be installed on your Pi. You'll typically download a .deb package and install it using
sudo dpkg -i <package_name>, then configure it to join your Hamachi network using commands likesudo hamachi loginandsudo hamachi join <network_ID>. Detailed instructions are available on the LogMeIn Hamachi support pages. - Verify Connection and SSH:
Once both your Mac and Pi are connected to the same Hamachi network, Hamachi will assign them virtual IP addresses within that network. You can see these IP addresses in the Hamachi client. Now, from your Mac's terminal, you can SSH into your Pi using its Hamachi IP address:
ssh pi@YOUR_HAMACHI_PI_IPThis method is fantastic because it allows remote access to Raspberry Pi behind firewall or NAT router without exposing any ports on your home router. It's like having your Pi right next to you on the same local network.
Option B: Reverse SSH Tunneling or Cloud-Based SSH Gateways
Another powerful technique involves setting up a reverse SSH tunnel to a publicly accessible server (like a cheap VPS) or using a cloud-based SSH gateway service (e.g., ngrok, Remote.It). This method is particularly robust for accessing your Raspberry Pi remotely via SSH behind a firewall without Windows (or any specific OS requirement for the client). Setting up a remote IoT platform SSH on a Raspberry Pi without a Mac may sound challenging, but it’s entirely achievable with the right approach.
How it Works:
Your Raspberry Pi initiates an SSH connection *out* to a public server. This connection is then kept open, and a port on the public server is forwarded *back* to your Pi's SSH port. When you want to access your Pi, you SSH into the public server, and from there, you can connect to your Pi through the established tunnel.
Services like Remote.It simplify this by providing a platform that manages these tunnels for you. You install their agent on your Pi, and then you can connect to it securely through their web interface or a local client, bypassing firewalls and NAT. Discover how to leverage remote IoT platform SSH Raspberry Pi download for seamless remote management and enhanced IoT operations.
Setting Up SSH on Your Raspberry Pi (Revisited for Security)
Regardless of the method you choose, ensuring your Raspberry Pi's SSH setup is secure is paramount. Configuring your Raspberry Pis safely from another device or location is key.
- Change Default Password: If you haven't already, change the default 'pi' user password immediately after enabling SSH.
- SSH Key Authentication: For the highest level of security, set up SSH key-based authentication. This involves generating a pair of cryptographic keys (a public key on your Pi, a private key on your Mac) and disabling password login. This way, only devices with the correct private key can connect.
- Firewall on Pi (Optional but Recommended): For advanced users, consider enabling a local firewall on your Raspberry Pi (e.g., UFW - Uncomplicated Firewall) to restrict incoming connections even further, allowing only specific IPs or ports.
Accessing from Your Mac
Once your chosen method is configured, accessing your Pi from your Mac is straightforward using the built-in Terminal application.
- Open Terminal (Applications > Utilities > Terminal).
- Use the
sshcommand with the appropriate IP address and port:- For Port Forwarding:
ssh pi@YOUR_PUBLIC_IP_ADDRESS -p YOUR_EXTERNAL_PORT - For Hamachi/VPN:
ssh pi@YOUR_HAMACHI_PI_IP - For Reverse SSH/Cloud Gateway: This will depend on the specific service, but often it's
ssh pi@YOUR_TUNNEL_ADDRESSor through a web portal.
- For Port Forwarding:
- You can also simplify your SSH commands by editing your Mac's SSH config file (
~/.ssh/config). This allows you to define aliases and specific settings for each Pi, making connections as simple asssh mypi.
Conclusion
Remotely accessing your Raspberry Pi behind a firewall or router doesn't have to be a daunting task. While traditional port forwarding offers a direct route, more secure and flexible methods like virtual private networks (e.g., LogMeIn Hamachi) or reverse SSH tunnels provide robust solutions that bypass the complexities and security risks associated with opening ports directly. These approaches ensure you can gain access to your Raspberry Pi remotely, even if it is behind a router or firewall, giving you the freedom to manage your projects from anywhere. Whether you're configuring your IoT devices or simply checking on your home server, mastering these remote access techniques is your ultimate guide to mastering the game of Raspberry Pi management.
Access Raspberry Pi Behind Router or Firewall Remotely

How to SSH Raspberry Pi Remote access from MAC / Windows - YouTube

How To Access Your Raspberry Pi Via Ssh Behind A Firewall Without
